Mozart Angular PRO UI Kit
Starter Kit Documentation
Introduction
- Item Name : Mozart Angular PRO UI Kit
- Item Version : v 1.0.7
- Author : Mozart PRO
- Support Contact : us.redjar@gmail.com
- License : Regular & Extended
First of all, Thank you so much for purchasing this template and for being my loyal customer.
You are awesome!
You are entitled to exceptional support from the author directly.
This documentation is to help you regarding each step of customization. Please go through the documentation carefully to understand how this template is made and how to edit this properly. Basic HTML and CSS knowledge is required to customize this template. You may learn basics from Angular docs, Cordova Docs and Bootrap guide.
Requirements
You will need the following installed in your system to use this template.
- Code Editor, recommended VS Code
- Web Browser for testing (eg: Google Chrome or Mozilla Firefox)
- Node 10 or higher, get it from Here
- Angular 8 or higher, get it from Here
- Apache Cordova, get it from Here
You have to be extra careful with node version while working with Angular.
Also, some versions of packages installed may not be compatible with each other, so you may have to refer documentation of any custom installed packaged in your application.
Getting Started #back to top
Mozart Angular PRO is a fully customizable Admin & Dashboard template. Fresh new design based on Angular & Bootstrap which is not only responsive but built into a Mobile App using cordova for running as native app on IOS & Android.
Download the Zip and open the poject in VS Code
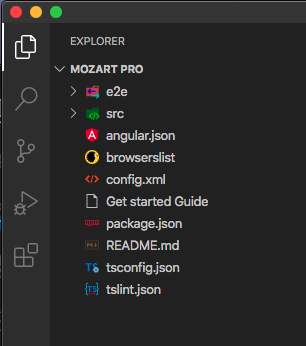
Once you browse to project location after extracting from zip, you will see above contents.
Build Project to Run
Goto terminal or command prompt depending on your OS and browse to project parent path.
Given you have node installed, run below command in terminal:
npm install
It will install all the dependencies in the project and you will see node_modules and other relevant files created at root of your project.
Run the project
Once build completes successfully, run below command to see website in browser(Assuming Angular is installed in your system with steps mentioned in introduction section):
ng serve --open
It will install the project and serve it in your default browser at location: localhost:4200. Make sure base href in src/index.html is set to `base href="/"` for running app on web browser.
Project Structure & Setup #back to top
Project files & their purpose
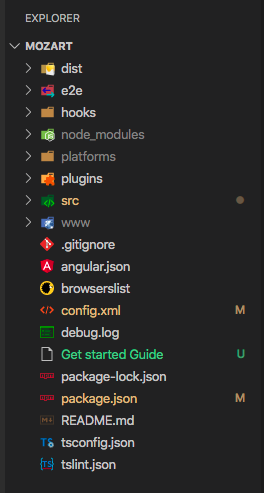
All projects within a workspace share a CLI configuration context. The top level of the workspace contains workspace-wide configuration files, configuration files for the root-level application, and subfolders for the root-level application source and test files.
| WORKSPACE CONFIG FILES | PURPOSE |
|---|---|
.editorconfig |
Configuration for code editors. See EditorConfig. |
.gitignore |
Specifies intentionally untracked files that Git should ignore. |
README.md |
Introductory documentation for the root app. |
angular.json |
CLI configuration defaults for all projects in the workspace, including configuration options for build, serve, and test tools that the CLI uses, such as TSLint, Karma, and Protractor. For details, see Angular Workspace Configuration. |
package.json |
Configures npm package dependencies that are available to all projects in the workspace. See npm documentation for the specific format and contents of this file. |
package-lock.json |
Provides version information for all packages installed into node_modules by the npm client. See npm documentation for details. If you use the
yarn client, this file will be yarn.lock instead. |
src/ |
Source files for the root-level application project. |
node_modules/ |
Provides npm packages to the entire workspace. Workspace-wide node_modules dependencies are visible to all projects. |
tsconfig.json |
Default TypeScript configuration for projects in the workspace. |
tslint.json |
Default TSLint configuration for projects in the workspace. |
At this stage project is setup and is ready to be modified or components can be extracted as needed.
Example Pages #back to top
Project features 22 Example pages
- 'Dashboard' - For charts, Admin reports and intermix of components.
- 'Product Page' - For listing products and store.
- 'Orders Page' - Users can see orders placed on the site.
- 'Checkout Page' - Finalize purchase and make payment.
- 'Covid Dashboard' - Customized page showing reports of Coronavirus affetced and numbers.
- 'Reports' - Example of reports, charts, analytics.
- 'Sales Charts' - Focus is on charts, donuts and analytics which can be reused.
- 'Tickets' - Bugs system, reporting issues, tickets and ability to solve and update cases.
- 'Messages' - Chat and message related example.
- 'Overview' - Intermix of various cards, custom designs of components.
- 'Customer Reviews' - Reviews at pages, where end users can leave reviews on page.
- 'Sale' - Sale like a POS solutions.
- 'Cart' - Added products which user can see on this page and can be taken to checkout page.
- 'Timeline' - A flow of information, can be used for social media app or tracking information.
- 'Advance Form' - Form with editing capabilities and various examples within form.
- 'Landing Page' - Page than can be kept as main page where user is directed when app launches.
- 'Campaign' - Advertisement or any other campaign page example.
- 'Cryptocurrency' - Cryptos, finance and reports, looks best in dark mode.
- 'Weather' - Weather related card designs and colors.
- 'Taskboard' - Featuring drag drop and a customizable task board for tracking items,
- 'Widgets' - Mix of various components and designs.
- 'Invoice - Purchases, finance, sale, records.
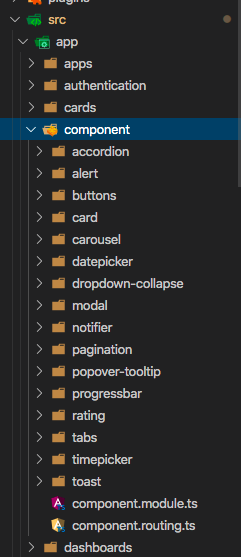
Each page in this starter kit is made from reusable components that exist in src/app/component of the project, and these demonstrate real world examples where these components can help.
How to generate a new page #back to top
1) First go to your Project Directory
2) Then Run below Command in terminal. ng generate component componentname OR ng g component componentname
3) After that you will see output like this:
create src/app/test/componentname.component.css (0 bytes)
create src/app/test/componentname.component.html (23 bytes)
create src/app/test/componentname.component.spec.ts (614 bytes)
create src/app/test/componentname.component.ts
(261 bytes)
update src/app/app.module.ts (1087 bytes)
After this step either new components can be added or components from the project can be reused on that page. In next step we will learn how to install component on the page.
How to install components in pages#back to top
Angular offers re-usablity with components, these hand designed components can be re-used and can be installed into your application and used as fit.
For example, if sales component is required to be installed in separate app, simply copy sales-summary folder from this template and paste it under src/app of your application and then add it in module under declarations, then use it like below:
Adding component in modules is necessary under declarations.
If same component is needed at multiple places, make sure, component is declared in parent module of both the pages and is declared once.
Themes and color customizations #back to top
Template features 6 customizable color themes and 2 modes - Light and Dark. These can be accessed byt clicking red settings icon on right side of the app. It opens a drawer from right which can chage app colors during runtime. Note that customizable parts in app are header bar, sidebar, and menu color. Other than these, dark or light theme effect overall app and its pages.
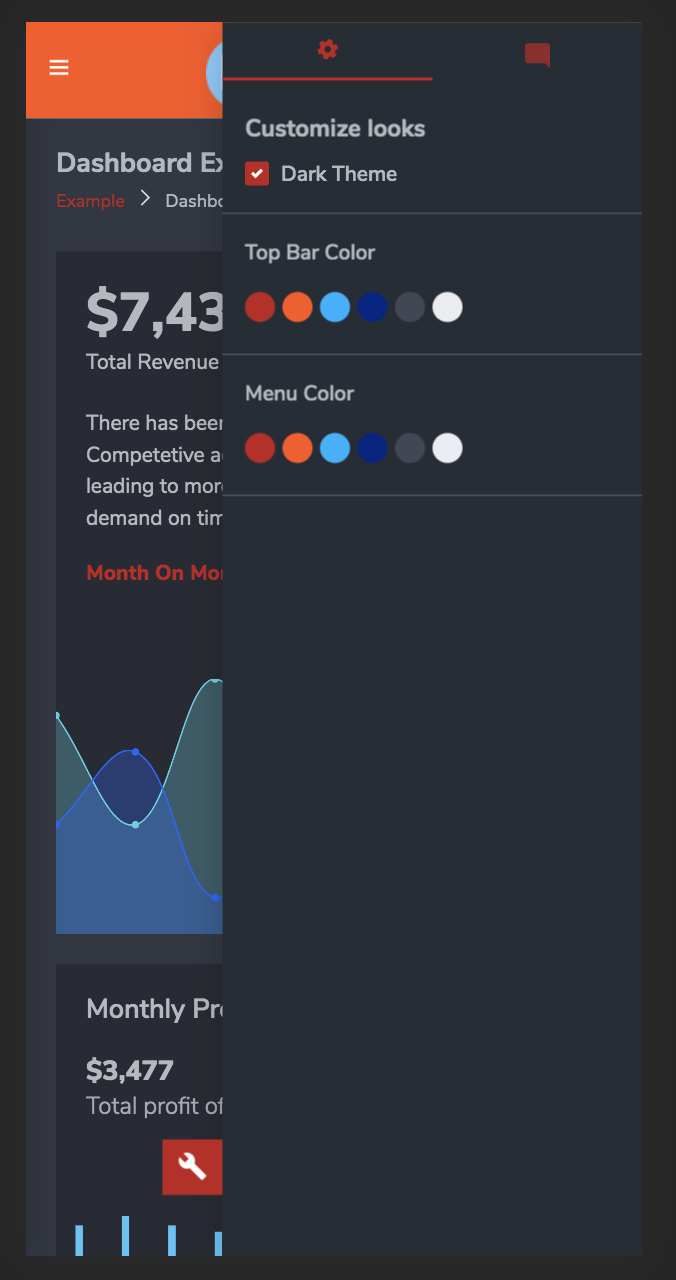
How to Enable Dark Mode ?
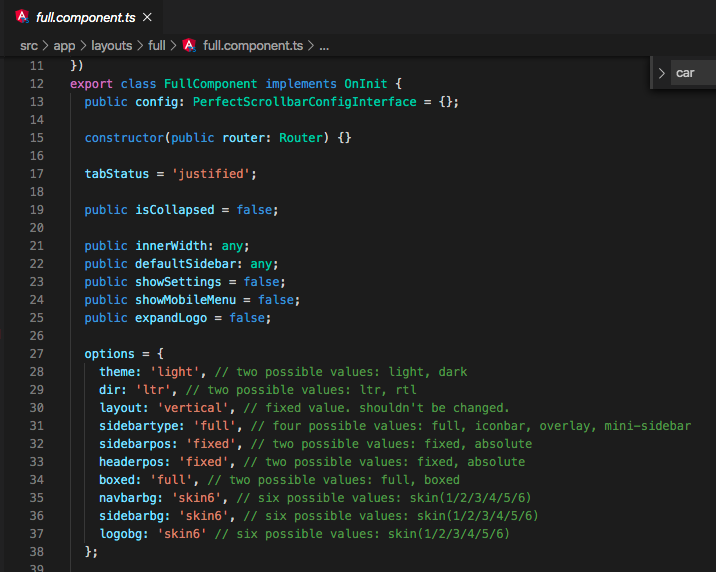
For setting default colors or theme to application, goto src/app/layout/full/full.component.ts & in that file, line 27 - options is responsible for loading default colors.
With above steps you can achieve below themes & custom colors on verious components.
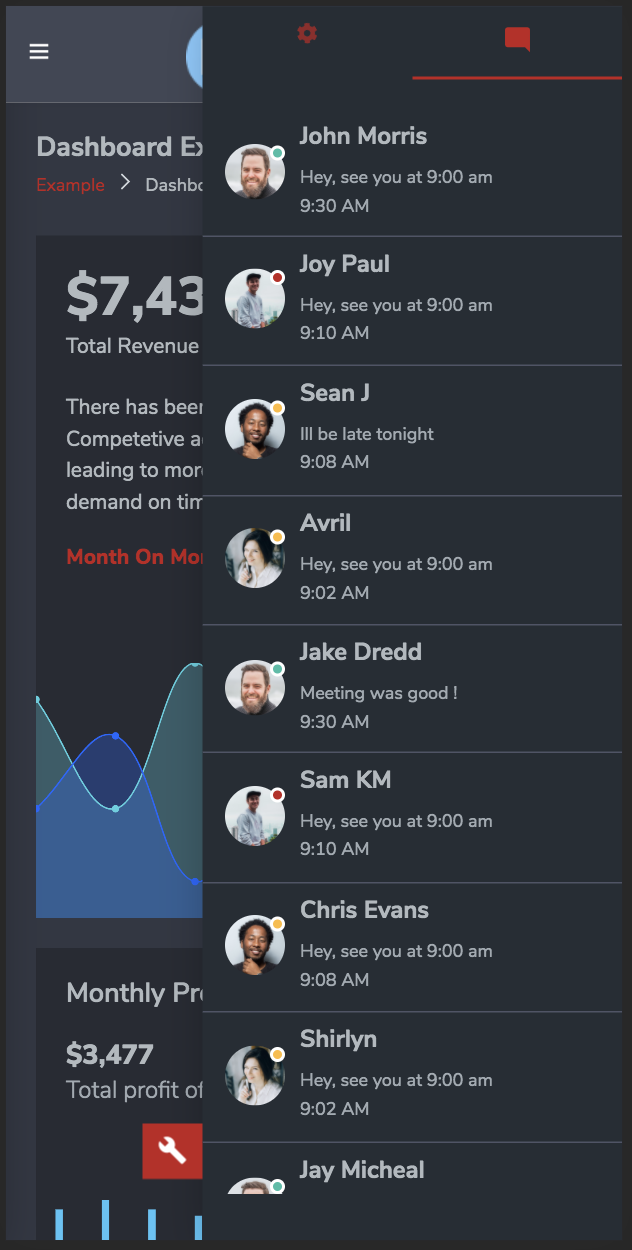
Dark theme
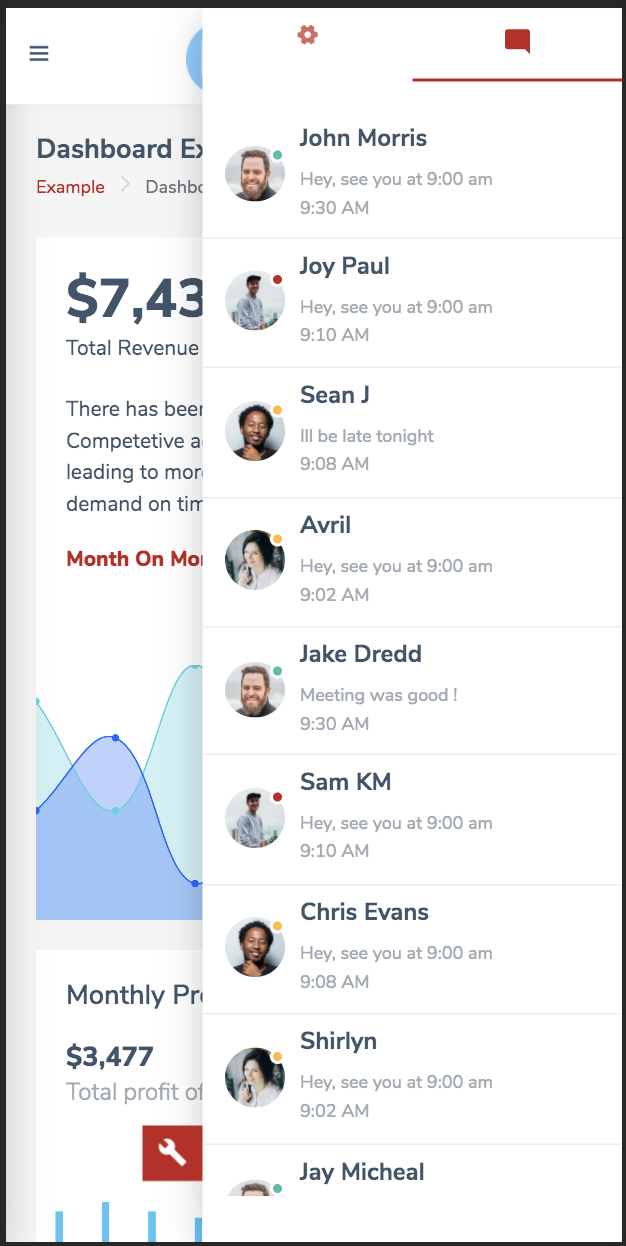
Light theme
How to change Default Colors #back to top
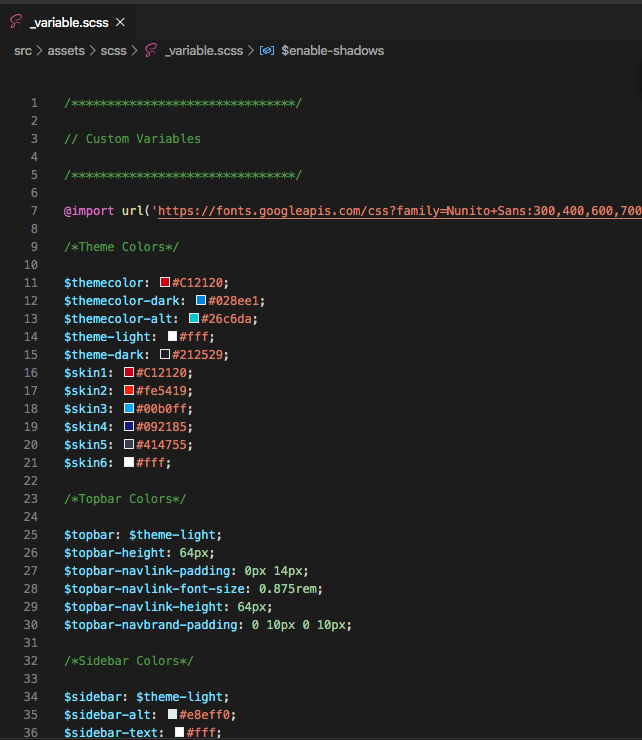
Update in _variable.scss - #back to top
This file is located under src/assets/scss/_variable.scss File enables customizable variables which are used accross the app. Template comes with pre-defined 6 color skins, which can be seen on top of this file. You can update values here and add your own colors in this section, which will be available across app.
If you would like to use styles defined in this app, into another compatible app, importing _variable.scss or merging it with existing one is possible, and straighforward. As long as defined classes in components match, it will not create and problem.
Building Mobile app - Android #back to top
-
Step 1: Installing cordova
Cordova command-line runs on Node.js and is available on NPM. Follow platform specific guides to install additional platform dependencies. Open a command prompt or Terminal, and type npm install -g cordova.
-
Step 2: Build application
Update index.html of application. In index, add . to base path, like this base href="./". Then run command ng build to build dist files in www folder which is configured in angular.json file of project.
-
Step 3: Add a platform
After creating a Cordova project, navigate to the project directory. From the project directory, you need to add a platform for which you want to build your app. To add a platform, type cordova platform add 'platform name'. For a complete list of platforms you can add, run cordova android
Building Mobile app - IOS #back to top
-
Step 1: Installing cordova
Cordova command-line runs on Node.js and is available on NPM. Follow platform specific guides to install additional platform dependencies. Open a command prompt or Terminal, and type npm install -g cordova.
-
Step 2: Build application
Update index.html of application. In index, add . to base path, like this base href="./". Then run command ng build to build dist files in www folder which is configured in angular.json file of project.
-
Step 3: Add a platform
After creating a Cordova project, navigate to the project directory. From the project directory, you need to add a platform for which you want to build your app. To add a platform, type cordova platform add 'platform name'. For a complete list of platforms you can add, run cordova ios
Browsers Support #back to top
# This file is currently used by autoprefixer to adjust CSS to support the below specified browsers
# For additional information regarding the format and rule options, please see:
# https://github.com/browserslist/browserslist#queries
# For IE 9-11 support, please uncomment the last line of the file browserslist at root of your project and adjust as needed
# IE 9-11
Copyright and license #back to top
General
The purchaser of this kit has to aide by the intellectual property laws and all of the terms and conditions of this Agreement.
If you do not agree to be bound by this agreement, remove any Item from your computer now and, if applicable, promptly return by mail any copies of the Item and related documentation and packaging in your possession.
License Period
An Item’s License is for the life time. That means, once you buy it, you can use the license forever within the restrictions described in this document.
About the Source Code
You can completely change it based on your requirements. Our items use many libraries, which are free and open source. If you need the source code of any library, you can just get it from its repository. So, there is no hidden code in that manner.
Use of the License
Your license to use any of our Items is limited to the number of licenses purchased by you. You shall not allow others to use, copy or evaluate copies of our Items.
Support #back to top
Get in touch.
We are more than glad to resolve your queries! Please constact us at: us.redjar@gmail.com and we will resolve your queries as soon as possible.